Kubernetes Tutorial: From Zero to Deploying Your First App
Learn Kubernetes from scratch with Docker Desktop or Minikube. Deploy Nginx with YAML, expose a Service, test self-healing, scale Pods, and roll back.
You have built a Docker image, run a container, and perhaps used Docker Compose to start several services together. What happens when your application needs to stay available while containers fail, traffic grows, or a new version rolls out?
That is where Kubernetes comes in.
Kubernetes (K8s) is a container orchestration platform that manages where containerized applications run, how many copies should exist, and how they recover when something fails. In this hands-on Kubernetes tutorial for beginners, you will create a local cluster, deploy three copies of an Nginx web server, open it in your browser, delete a Pod to observe self-healing, and practice scaling and updates.
You do not need a paid cloud account. The tutorial uses Docker Desktop or Minikube on your own computer.
If container images, Dockerfiles, or Compose are still unfamiliar, start with our Docker tutorial for beginners and return here when you are comfortable running a container.
What is Kubernetes, and when do you need it?
Docker helps you package an application into an image and run that image as a container. Kubernetes focuses on managing containerized workloads across a cluster. The cluster might be a single laptop for learning or several machines in a production environment.
Imagine a small online store. Running its website in one container may be perfectly adequate at first. But if the container stops, the website becomes unavailable until something restarts it. If you run several copies across different machines, you now need a way to coordinate them.
Kubernetes helps with that coordination:
- Self-healing: Controllers replace missing Pods, and failed containers may be restarted according to their restart policy. Kubernetes cannot fix a bug inside your application.
- Scaling: You can manually change the number of replicas. Automatic scaling is available through separately configured features such as the HorizontalPodAutoscaler (HPA), which requires suitable metrics.
- Rolling updates and rollbacks: Deployments can replace Pods gradually and return to an earlier revision. Continuous availability still depends on application health, capacity, and correct configuration.
- Service discovery: Services provide a stable way to reach a changing set of Pods, and Kubernetes provides DNS-based service discovery inside a cluster.
Do you need Kubernetes for every Docker project? No. A single application or a modest set of services may be easier to operate with Docker Compose. Kubernetes becomes useful when the benefits of scheduling, replication, recovery, and standardized deployment outweigh the cost of learning and managing the platform.
Kubernetes architecture explained without the jargon
A Kubernetes cluster contains a control plane that coordinates the system and one or more Nodes that run your workloads. The basic building blocks are:
| Component | What it does | How to think about it |
|---|---|---|
| Cluster | The complete Kubernetes environment | A team of machines managed together |
| Control plane | Schedules workloads and maintains desired state | The coordinator of the team |
| Node | A physical or virtual machine that runs Pods | One worker machine |
| Pod | The smallest deployable unit; usually runs one container | A wrapper around one or more tightly coupled containers |
| Deployment | Declares and maintains a set of interchangeable Pods | The desired replica count and update plan |
| Service | Gives selected Pods a stable network endpoint | A consistent address in front of changing Pods |
These comparisons are mental models, not exact one-to-one Docker equivalents. For example, a Kubernetes Pod is not identical to a container, and modern Kubernetes does not require Docker Engine on its Nodes.
Here is the relationship you will build:
Kubernetes cluster
|
+-- Control plane
|   +-- Maintains the desired state
|
+-- Node (local machine or VM)
    +-- Pod: nginx container
    +-- Pod: nginx container
    +-- Pod: nginx container

Service: glimpz-web-service
    +-- Routes requests to ready Pods
A Deployment asks for three Pods. The Kubernetes controllers work to maintain that number. A Service selects those Pods using labels, so clients do not need to track individual Pod IP addresses.
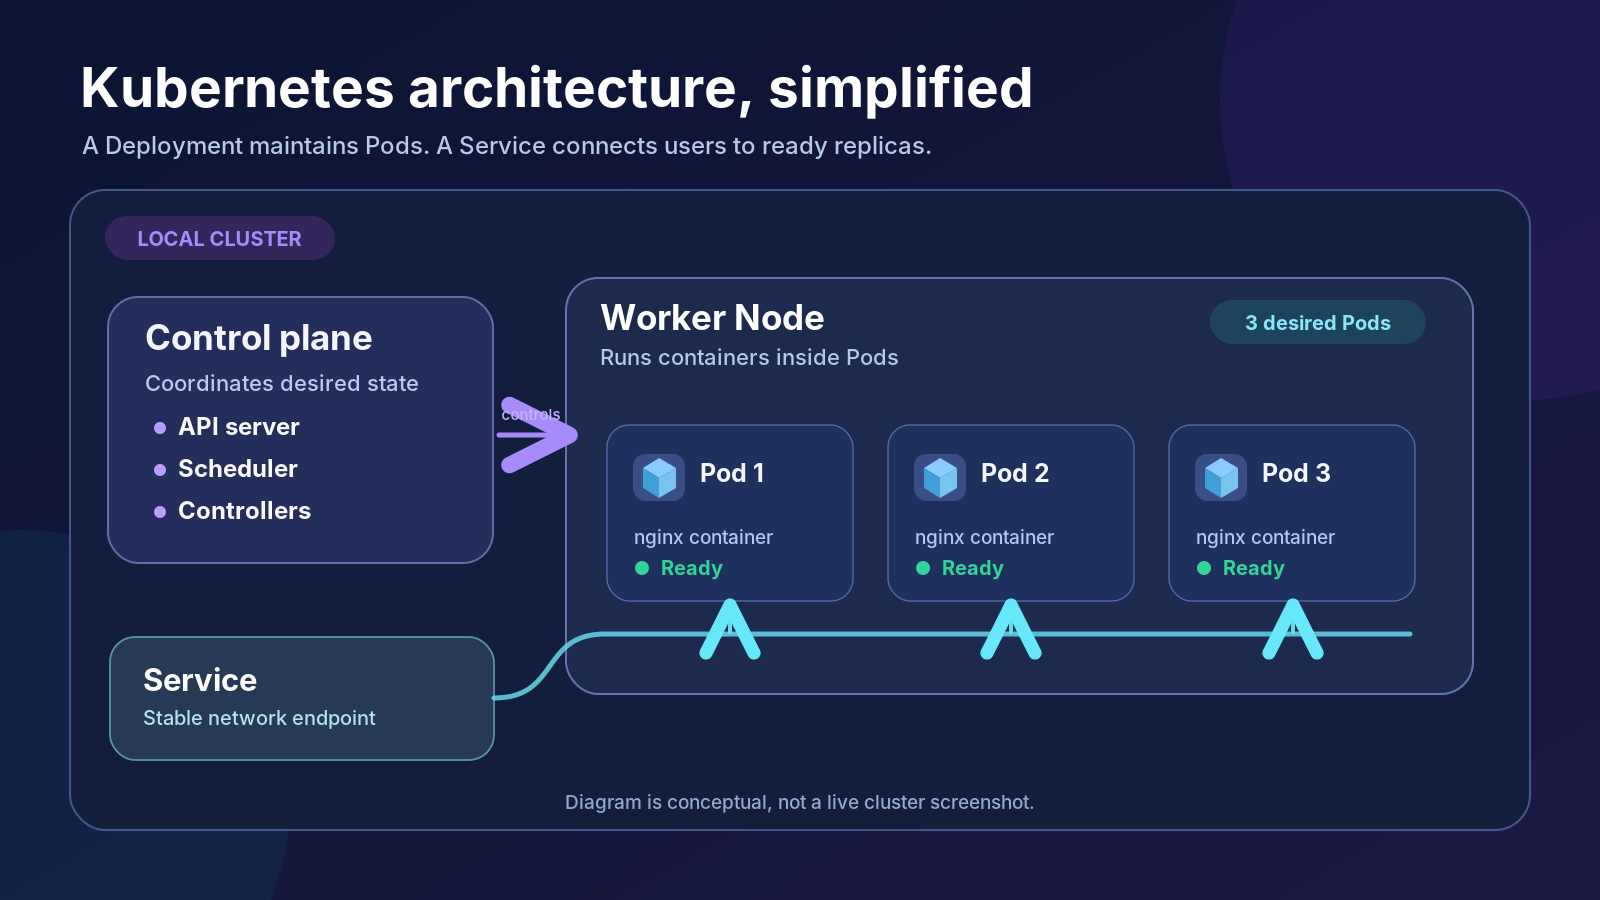
One important limitation: a single-node local cluster is excellent for learning Pod replacement, but it cannot demonstrate surviving the loss of the only Node. Actual node-failure resilience requires multiple suitable Nodes and application design that supports recovery.
Before you start: tools and local cluster setup
You need a terminal, a text editor, an internet connection for downloading container images, and enough free resources to run a local cluster. The exact memory and CPU requirements depend on your operating system and cluster configuration.
Choose one of the following paths:
Option A: Docker Desktop
If you already use Docker Desktop, its built-in Kubernetes integration may be the easiest option.
- Open the Docker Desktop dashboard.
- Open the Kubernetes view and choose Create cluster. On some older versions, Kubernetes is enabled under Settings > Kubernetes.
- Choose the default single-node setup for this beginner tutorial. Newer Docker Desktop versions may also offer a multi-node option based on
kind. - Create the cluster and allow its components to start.
The exact labels can differ by Docker Desktop version. Refer to the current Docker Desktop Kubernetes guide (opens in a new tab) if your screen differs.
Option B: Minikube
Minikube (opens in a new tab) runs a local Kubernetes cluster on Windows, macOS, or Linux. Install Minikube and a supported virtualization or container driver, then run:
minikube startIf you already have Docker running and want to use it as the driver, Minikube also supports:
minikube start --driver=dockerInstall kubectl separately if your environment does not provide it. The official kubectl installation guide (opens in a new tab) covers supported operating systems. Use a kubectl release within one minor version of your cluster’s API server.
Verify that kubectl reaches the cluster
Run:
kubectl version --client
kubectl config current-context
kubectl cluster-info
kubectl get nodes
kubectl version --client checks the tool on your computer. The other commands check which cluster you are using and whether it responds.
For the default local setups, you will typically see a Node named docker-desktop or minikube with STATUS set to Ready. A multi-node setup will show more than one Node.
If kubectl points to the wrong cluster, first inspect your available contexts:
kubectl config get-contextsDo not blindly switch contexts on a computer that also has access to production infrastructure.
Hands-on: deploy your first Kubernetes application
We will use the official Nginx container image as a simple web-server example. It is a real containerized workload, but not a custom application we have built. Starting with a known image keeps the Kubernetes concepts easier to see.
Step 1: Create the Deployment YAML
Make a new folder named glimpz-kubernetes-demo. Inside it, create a file called deployment.yaml containing:
apiVersion: apps/v1
kind: Deployment
metadata:
  name: glimpz-web-deployment
  labels:
    app: glimpz-web
spec:
  replicas: 3
  selector:
    matchLabels:
      app: glimpz-web
  strategy:
    type: RollingUpdate
    rollingUpdate:
      maxUnavailable: 0
      maxSurge: 1
  template:
    metadata:
      labels:
        app: glimpz-web
    spec:
      containers:
        - name: nginx-container
          image: nginx:stable-alpine
          ports:
            - containerPort: 80
          readinessProbe:
            httpGet:
              path: /
              port: 80
            initialDelaySeconds: 2
            periodSeconds: 5
          resources:
            requests:
              cpu: "50m"
              memory: "64Mi"
            limits:
              cpu: "250m"
              memory: "128Mi"
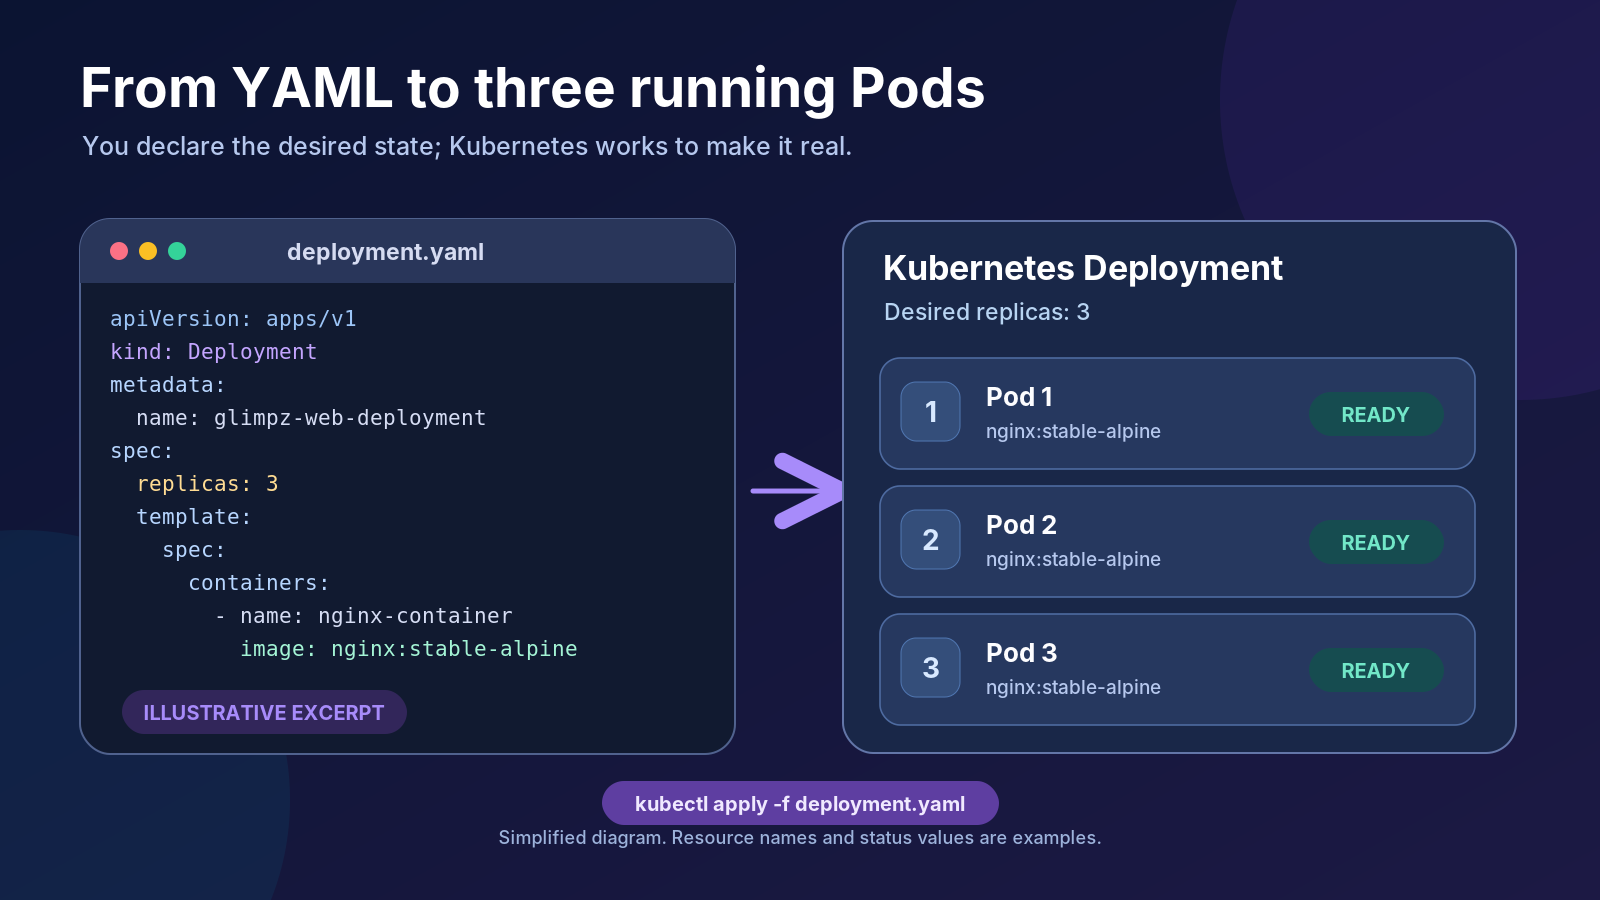
The important lines are:
kind: Deploymentcreates a Deployment rather than an unmanaged Pod.replicas: 3requests three Pods.selector.matchLabelsconnects the Deployment to Pods carrying theapp: glimpz-weblabel.imagespecifies the container image to run.readinessProbechecks whether Nginx is responding before a Pod is considered ready to receive Service traffic.maxUnavailable: 0andmaxSurge: 1aim to keep the existing replicas available during an update while permitting one extra Pod temporarily. They require sufficient spare cluster capacity.
The image tag is convenient for a learning environment. For production releases, use a version or digest that you have validated so the image cannot change unexpectedly when a tag moves.
Step 2: Apply the Deployment and inspect your Pods
Open a terminal in the folder containing the YAML file:
kubectl apply -f deployment.yaml
kubectl rollout status deployment/glimpz-web-deployment
kubectl get deployments
kubectl get pods -l app=glimpz-web
The first command sends your desired state to the Kubernetes API. The rollout command waits for the Deployment to make progress. The last command lists only Pods carrying our demo label.
Once the images have downloaded and the Pods are ready, expect the Deployment to report 3/3 ready replicas. Pod names are generated and will not match one fixed example.
If a Pod is still Pending or ContainerCreating, give it a moment, then use the troubleshooting section below if it remains stuck.
Step 3: See self-healing in action
List the Pods first:
kubectl get pods -l app=glimpz-webCopy one real Pod name from your output, then delete it. Replace YOUR_POD_NAME with that name; do not type the angle-bracket placeholder from a tutorial as a literal command.
kubectl delete pod YOUR_POD_NAME
kubectl get pods -l app=glimpz-web -w
Use Ctrl+C to stop the live watch.
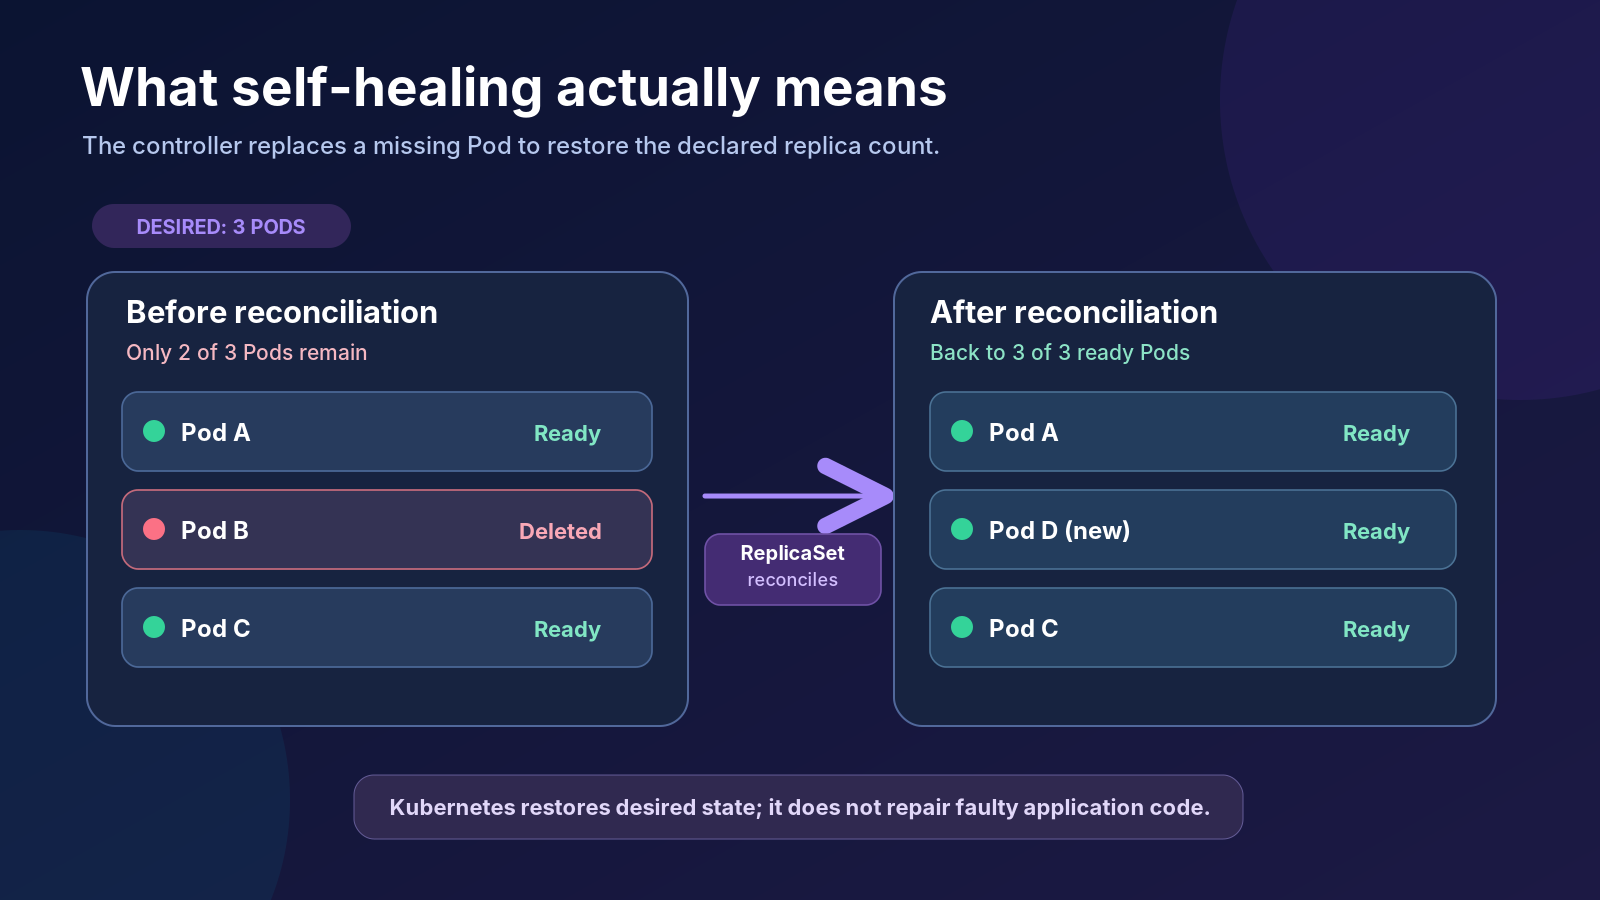
You should observe the deleted Pod terminating and another Pod being created so the Deployment can return to three desired replicas. The exact timing varies with your laptop, image cache, and cluster state.
Why does this happen? The Deployment and ReplicaSet controllers continually reconcile what exists with what you asked for. Deleting a managed Pod does not change the replicas: 3 setting, so Kubernetes creates a replacement. This is one form of self-healing, not a guarantee that every software failure is automatically resolved.
Step 4: Create a Service so the app has a stable address
Pods are replaceable. Their individual IP addresses are not a reliable public entry point for your app.
In the same folder, create service.yaml:
apiVersion: v1
kind: Service
metadata:
  name: glimpz-web-service
spec:
  type: NodePort
  selector:
    app: glimpz-web
  ports:
    - name: http
      protocol: TCP
      port: 80
      targetPort: 80
      nodePort: 30080
The Service’s selector must match the labels on your Pods. Here, it selects all three replicas. port: 80 is the Service port, targetPort: 80 is the container’s listening port, and nodePort: 30080 requests a port on the cluster Nodes.
Apply it:
kubectl apply -f service.yaml
kubectl get services
kubectl get endpointslices -l kubernetes.io/service-name=glimpz-web-service
For the most predictable local browser test, run:
kubectl port-forward service/glimpz-web-service 8080:80Keep that terminal open and visit http://localhost:8080 (opens in a new tab) in your browser. You should see the default Nginx welcome page. The port forwarding ends when you stop the command.
If you specifically want to try NodePort access:
- On some Docker Desktop local cluster configurations,
http://localhost:30080works directly. - With Minikube, run
minikube service glimpz-web-serviceand open the address it provides. On Docker-driver setups for Windows or macOS, Minikube may create a temporary tunnel that must remain open.
If port 30080 is already allocated or your cluster has a different allowed NodePort range, remove the nodePort line, apply the Service again, and use kubectl port-forward. NodePort is fine for a local exercise, but it is not a complete public production ingress setup.
Step 5: Scale from three Pods to five
Kubernetes separates the desired number of replicas from the physical containers that happen to be running.
Try manual scaling:
kubectl scale deployment/glimpz-web-deployment --replicas=5
kubectl rollout status deployment/glimpz-web-deployment
kubectl get pods -l app=glimpz-web
When sufficient resources are available, you should see five ready Pods. They all remain behind the same Service.
Important: Your saved deployment.yaml still says replicas: 3. Change that line to replicas: 5 if you want your file to represent the current desired state. Otherwise, a later kubectl apply -f deployment.yaml can reset the count to three.
This is manual scaling, not automatic scaling. An HPA can adjust replicas based on configured metrics, but you have not installed or configured one in this tutorial.
Step 6: Roll out an image update and know how to undo it
A Deployment supports gradual updates by creating replacement Pods from a new Pod template.
In deployment.yaml, keep your chosen replica count and change the image from:
image: nginx:stable-alpineto:
image: nginx:mainline-alpineThese are maintained Nginx release-channel tags, so this exercise demonstrates a change in image reference. It is not a recommendation to update production software without reviewing compatibility and pinning a tested release.
Apply your edited file and monitor the rollout:
kubectl apply -f deployment.yaml
kubectl rollout status deployment/glimpz-web-deployment
kubectl rollout history deployment/glimpz-web-deployment
kubectl get pods -l app=glimpz-web
If you need to return to the previous Deployment revision:
kubectl rollout undo deployment/glimpz-web-deployment
kubectl rollout status deployment/glimpz-web-deployment
A rollback changes the live Deployment, but it does not edit your local YAML file. Change the file back too if you want later applies to preserve the rollback.
Rolling updates can minimize interruptions. They do not guarantee zero downtime for every application. Readiness checks, enough healthy replicas, rollout settings, and the application’s own behavior all matter.
Step 7: Clean up after the tutorial
When you are finished, delete the Kubernetes objects created by these two files:
kubectl delete -f service.yaml -f deployment.yamlCheck that they are gone:
kubectl get deployments
kubectl get services
This removes the example resources, not your entire Kubernetes cluster. If you used Minikube and no longer need the cluster, minikube stop stops it without deleting it.
Everyday kubectl commands worth keeping
| What you want to do | Command |
|---|---|
| See your current cluster | kubectl config current-context |
| List Nodes | kubectl get nodes |
| List Pods | kubectl get pods |
| List Deployments | kubectl get deployments |
| List Services | kubectl get services |
| Watch Pods change | kubectl get pods -w |
| Inspect why a Pod is failing | kubectl describe pod POD_NAME |
| View container logs | kubectl logs POD_NAME |
| Open a shell in an Nginx Pod | kubectl exec -it POD_NAME -- /bin/sh |
| Check rollout progress | kubectl rollout status deployment/glimpz-web-deployment |
| See recent namespace events | kubectl get events --sort-by=.metadata.creationTimestamp |
| List common workload resources | kubectl get all |
kubectl get all does not literally show every resource type in the cluster. Most commands above operate in the current namespace unless you add a namespace flag.
Troubleshooting: what if the tutorial does not work?
| Symptom | What it may mean | What to try |
|---|---|---|
kubectl get nodes cannot connect | No cluster is running, or the wrong context is active | Start your cluster and inspect kubectl config get-contexts |
Pod stays in Pending | Insufficient CPU or memory, or a scheduling issue | Run kubectl describe pod POD_NAME and read the Events section |
ImagePullBackOff | The image cannot be downloaded | Check the image name, internet access, and Pod Events |
CrashLoopBackOff | A container repeatedly starts and fails | Check kubectl logs POD_NAME --previous and kubectl describe pod POD_NAME |
| Service exists but browser shows nothing | Wrong port, selector, or no ready Pods | Compare Pod labels and Service selectors; try kubectl port-forward |
| An update will not finish | New Pods are not ready or cannot be scheduled | Check kubectl get pods, kubectl describe deployment, and resource capacity |
A useful debugging habit is to read Events before changing random settings. Kubernetes often reports why it could not pull an image, schedule a Pod, or pass a readiness check.
Kubernetes questions beginners often ask
Is Kubernetes a replacement for Docker?
No. Docker is commonly used to build container images. Kubernetes runs containerized applications and manages their lifecycle across Nodes using compatible container runtimes, such as containerd. You can use Docker in your development workflow and Kubernetes for deployment.
Does Kubernetes automatically scale when traffic increases?
Not just because you created a Deployment. Your five-Pod example used manual scaling. To automate replica counts, configure an HPA with supported resource or custom metrics and make sure the necessary metrics components are available.
Is a three-Pod Deployment highly available on a laptop?
Not in the sense of surviving a laptop or single-Node failure. Running three Pods on one Node can demonstrate replacement and replica management, but all three depend on that Node. Production resilience needs more than a replica number.
Why use a Service instead of connecting directly to a Pod?
Pods can be deleted, replaced, or assigned new IP addresses. A Service gives you a stable name and networking abstraction that selects the current matching Pods, so clients do not need to know each Pod’s identity.
What to learn after this Kubernetes tutorial
You now have the foundations of a Kubernetes workflow: define a desired state in YAML, apply it, inspect the result, expose a Service, observe recovery, change replicas, and perform a rolling update.
From here, the most useful next topics are ConfigMaps and Secrets for configuration, PersistentVolumes for data that must survive Pod replacement, Ingress or Gateway API for HTTP routing, health probes, resource requests and limits, and HorizontalPodAutoscaler for metrics-based scaling. For production environments, compare managed Kubernetes services such as Amazon EKS, Google Kubernetes Engine, and Azure Kubernetes Service with simpler hosting options before deciding that Kubernetes is necessary.
Try one small improvement yourself: replace the Nginx demo image with a container image you built in Docker, publish it to a registry your cluster can access, and update the Deployment’s image and port settings. That connects this tutorial to the container skills you already learned.
References and further reading
- Kubernetes documentation: Deployments (opens in a new tab)
- Kubernetes documentation: Self-healing (opens in a new tab)
- Kubernetes documentation: Services (opens in a new tab)
- Kubernetes documentation: Horizontal Pod Autoscaling (opens in a new tab)
- Kubernetes documentation: kubectl port-forward (opens in a new tab)
- Docker Docs: Kubernetes in Docker Desktop (opens in a new tab)
- Minikube documentation: Accessing apps (opens in a new tab)
Keep exploring
Join the conversation
Keep comments respectful and relevant. Please don't share private or sensitive information.
Discussion (0)
Join the conversation