Docker Tutorial for Beginners: From Containers to Compose
Learn Docker step by step: install Docker, understand images and containers, build a Python API, use Compose and volumes, and fix common errors.
You finish building an application, send it to a teammate, and hear the familiar response: “It doesn’t work on my machine.” The application expects a particular Python version, a package is missing, or a database has been configured differently. You can spend hours comparing environments before you even start fixing the application itself.
Docker helps solve this by packaging an application and the environment it needs into a container image. You can use that image to run an isolated container on another compatible Docker host. It does not make every deployment problem disappear, but it dramatically reduces one common source of surprises: inconsistent application environments.
This Docker tutorial for beginners explains the ideas first, then walks through a practical project. You will run your first container, build an image for a Python FastAPI service, and use Docker Compose to run that service alongside Redis. At the end, you will also know how to preserve data, inspect logs, troubleshoot common errors, and decide when Docker is worth using.
What you will build: a small text-analysis API that counts words and characters, plus a visit counter stored in Redis. The text analysis is intentionally rule-based, not an AI model. It keeps the exercise approachable while using the same container patterns that can later support a model-inference API.
What is Docker, and why do developers use it?
Docker is a platform and set of tools for building, distributing, and running containerized applications. A container is an isolated process with the files and dependencies required by its application. A container image is the packaged starting point used to create that container.
Consider a Python web API. On a traditional local setup, you might install Python, pip packages, and services directly on your computer. With Docker, you describe the runtime in a Dockerfile, build an image, and create a container from it. Your teammate can start from the same image instead of manually recreating the setup.
Docker is useful for:
- Consistent development environments: team members can work with the same application runtime and declared dependencies.
- Reproducible testing: CI pipelines can build images and test applications in a controlled environment.
- Service isolation: a frontend, API, and database can run as separate containers.
- Convenient deployment: an image provides a transportable application artifact, although production environments still need configuration, secrets, networking, and monitoring.
- Experimentation: you can try a tool or service without installing all of its components directly on your computer.
Docker is not the only container technology, and a container is not a virtual machine. Understanding that distinction makes the next steps much easier.
Containers vs. virtual machines: what is the difference?
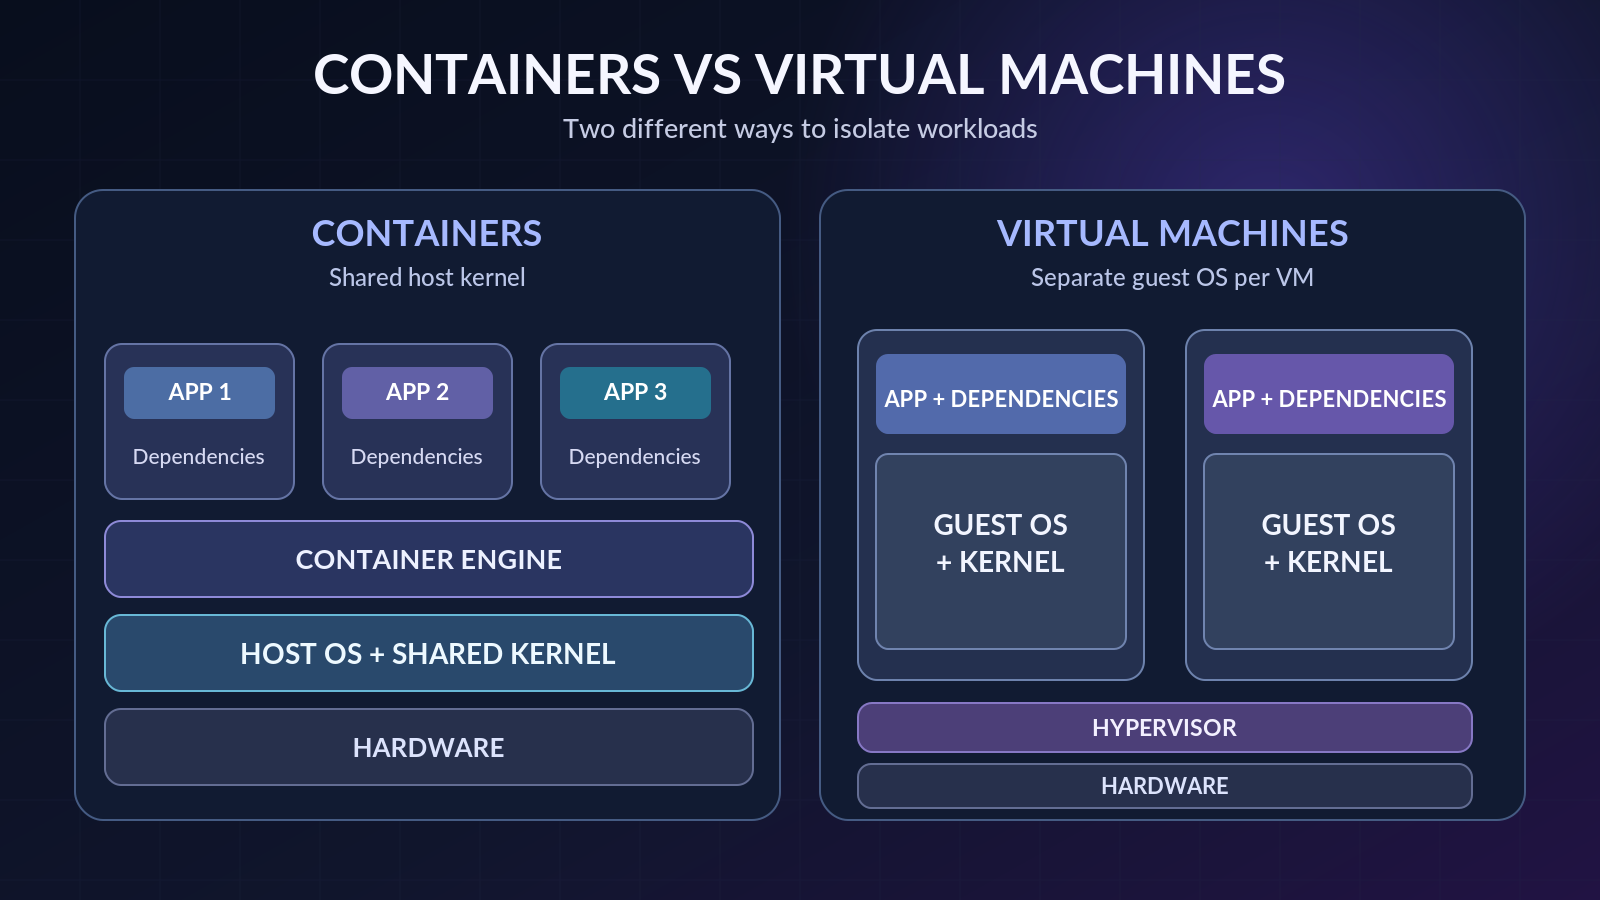
A virtual machine (VM) usually includes a separate guest operating system and kernel running on virtualized hardware. Linux containers on the same Linux host share the host’s kernel while isolating their processes and filesystems. This often makes containers lighter-weight than full VMs, although the exact resource savings depend on your workload.
| Question | Containers | Virtual machines |
|---|---|---|
| What runs the application? | An isolated process with its dependencies | A guest operating system running the application |
| Kernel | Shares the Linux host kernel | Uses its own guest OS kernel |
| Typical startup | Often quick | Typically more involved |
| Isolation | Process-level isolation, not a full VM boundary | Stronger OS-level boundary through virtualization |
| Common use | Packaging and running services | Running different operating systems or strongly separated environments |
On Windows and macOS, Docker Desktop commonly uses a Linux VM behind the scenes for Linux containers. So containers and VMs are not always competing choices. They often work together. Docker’s container concepts guide (opens in a new tab) explains this distinction in more detail.
Five Docker concepts you should know before typing commands
The terminology sounds similar at first, so it helps to connect each term with a simple job.
| Term | What it means | How you use it |
|---|---|---|
| Docker Engine | The software that builds and runs containers | Runs your local or server-side container workloads |
| Image | A packaged template containing application files and runtime layers | Build it, pull it, or share it |
| Container | A running or stopped instance created from an image | Start, stop, inspect, or remove it |
| Dockerfile | Text instructions for building an image | Define your application environment |
| Registry | A service that stores and distributes images | Pull images from a registry such as Docker Hub |
An easy analogy is a recipe and a meal. An image is like the prepared recipe package; a container is the instance you actually run. You can create several containers from the same image without changing the image itself.
You will encounter three more terms later: ports let you access services inside containers, volumes keep data outside a container’s short-lived writable layer, and Docker Compose describes how multiple containers should run together.
Step 1: Install Docker on Windows, macOS, or Linux
For a first project, Docker Desktop is a convenient choice. It includes Docker Engine, the command-line interface, and Docker Compose. It is available for Windows, macOS, and supported Linux environments. Linux users can also install Docker Engine and the Compose plugin separately.
Use the official guide for your operating system rather than following installation screenshots from an old article:
- Install Docker Desktop on Windows (opens in a new tab)
- Install Docker Desktop on macOS (opens in a new tab)
- Install Docker Engine on Linux (opens in a new tab)
- Install Docker Compose (opens in a new tab)
On Windows, check the currently documented requirements for WSL 2 or another supported backend. On macOS, select the installer that matches your machine. Once installed, launch Docker Desktop and wait until the engine is running.
A licensing note: Docker Desktop is free for personal use, education, qualifying small businesses, and non-commercial open-source work under its published terms. Some organizational and government uses require a paid subscription. Check Docker’s current license information (opens in a new tab) before adopting it at work.
Open PowerShell, Terminal, or another terminal and check your installation:
docker --version
docker compose version
docker info
The first two commands show whether the command-line tools are installed. docker info also contacts the Docker daemon. If it reports a connection error, start Docker Desktop or the Docker service and try again.
Step 2: Run your first Docker container
Before building anything, try a tiny, official starter test:
docker run --rm hello-worldDocker looks for the hello-world image locally. If it is missing, Docker normally downloads it from a configured registry. Then it creates and runs a container. The --rm option removes that container when the process finishes.
Now start a simple web server that you can open in your browser:
docker run --name docker-web -d -p 127.0.0.1:8080:80 nginx:stable-alpineVisit http://localhost:8080 (opens in a new tab). You should see the default Nginx page if the image was pulled and the container started successfully.
The command becomes less mysterious when you break it apart:
| Part | Purpose |
|---|---|
docker run | Create and start a container from an image |
--name docker-web | Give the container a memorable name |
-d | Run it in the background |
-p 127.0.0.1:8080:80 | Connect local port 8080 to container port 80, bound to the local loopback interface |
nginx:stable-alpine | Choose the Nginx image and tag |
You have not installed Nginx directly on your operating system. Docker is running it inside a container.
See what is running:
docker ps
docker logs docker-web
When you are finished, stop and remove it:
docker stop docker-web
docker rm docker-web
Stopping a container does not automatically delete it. Removing the container does not automatically remove its image.
Step 3: Create a small Python API to containerize
For a more useful exercise, we will build our own image. Create a directory named glimpz-docker-lab and open it in your code editor. Inside it, create the following files:
glimpz-docker-lab/
  app.py
  requirements.txt
  Dockerfile
  .dockerignore
  compose.yaml
Start with app.py:
import os
import re

from fastapi import FastAPI, HTTPException
from pydantic import BaseModel, Field
from redis import Redis
from redis.exceptions import RedisError

app = FastAPI(title="Glimpz Docker Lab")


class TextInput(BaseModel):
    text: str = Field(min_length=1, max_length=5000)


@app.get("/")
def home():
    return {"message": "Glimpz Docker Lab is running"}


@app.post("/analyze")
def analyze(payload: TextInput):
    words = re.findall(r"\b[\w']+\b", payload.text)
    return {
        "word_count": len(words),
        "character_count": len(payload.text),
    }


@app.get("/visits")
def visits():
    try:
        client = Redis(
            host=os.getenv("REDIS_HOST", "redis"),
            port=6379,
            decode_responses=True,
            socket_connect_timeout=2,
        )
        return {"visits": client.incr("visits")}
    except RedisError:
        raise HTTPException(
            status_code=503,
            detail="Redis is unavailable. Start the app with Docker Compose.",
        ) from None
This application exposes three endpoints. The root endpoint confirms that the service is running. /analyze accepts some text and returns its word and character counts. /visits increases a counter in Redis, which we will add through Compose later.
The project deliberately does not load a machine learning model. If you eventually replace the text-counting logic with an actual inference function, much of the Docker setup can stay the same.
Next, create requirements.txt:
fastapi>=0.115,<1.0
uvicorn>=0.34,<1.0
redis>=5,<8
These version ranges keep the learning exercise flexible. For a real deployment, resolve and lock exact dependency versions, test upgrades, and review security advisories so builds remain reproducible.
Step 4: Write your first Dockerfile
A Dockerfile tells Docker how to assemble the application image. Create a file literally named Dockerfile, with no .txt extension:
FROM python:3.12-slim

WORKDIR /app

ENV PYTHONDONTWRITEBYTECODE=1 \
    PYTHONUNBUFFERED=1

COPY requirements.txt .
RUN pip install --no-cache-dir -r requirements.txt

COPY app.py .

RUN useradd --create-home --uid 10001 appuser
USER appuser

EXPOSE 8000
CMD ["uvicorn", "app:app", "--host", "0.0.0.0", "--port", "8000"]
Here is what each important instruction does:
FROMselects a Python base image. Theslimvariant contains fewer extra tools than the full image.WORKDIRsets the working directory inside the image.ENVconfigures Python to avoid writing bytecode files and to send output directly to logs.COPY requirements.txtandRUN pip installinstall dependencies before copying application code. This helps Docker reuse dependency layers when only your code changes.COPY app.pyadds the application itself.USER appuseravoids running the application process as root inside the container.EXPOSE 8000documents the intended container port. It does not publish that port to your laptop by itself.CMDstarts Uvicorn and makes the API listen on all network interfaces inside the container.
Docker builds images in layers and can reuse unchanged layers. This is why the order of COPY and RUN statements matters. See the official Dockerfile guide (opens in a new tab) for more detail.
Now create .dockerignore:
.git
.venv
__pycache__/
*.pyc
.env
*.log
This keeps local environments, Git history, secret-bearing environment files, and unnecessary artifacts out of the build context. A .dockerignore is useful, but it does not replace proper secret management.
Step 5: Build your image and start the Python container
In a terminal, navigate to the folder containing your Dockerfile, then run:
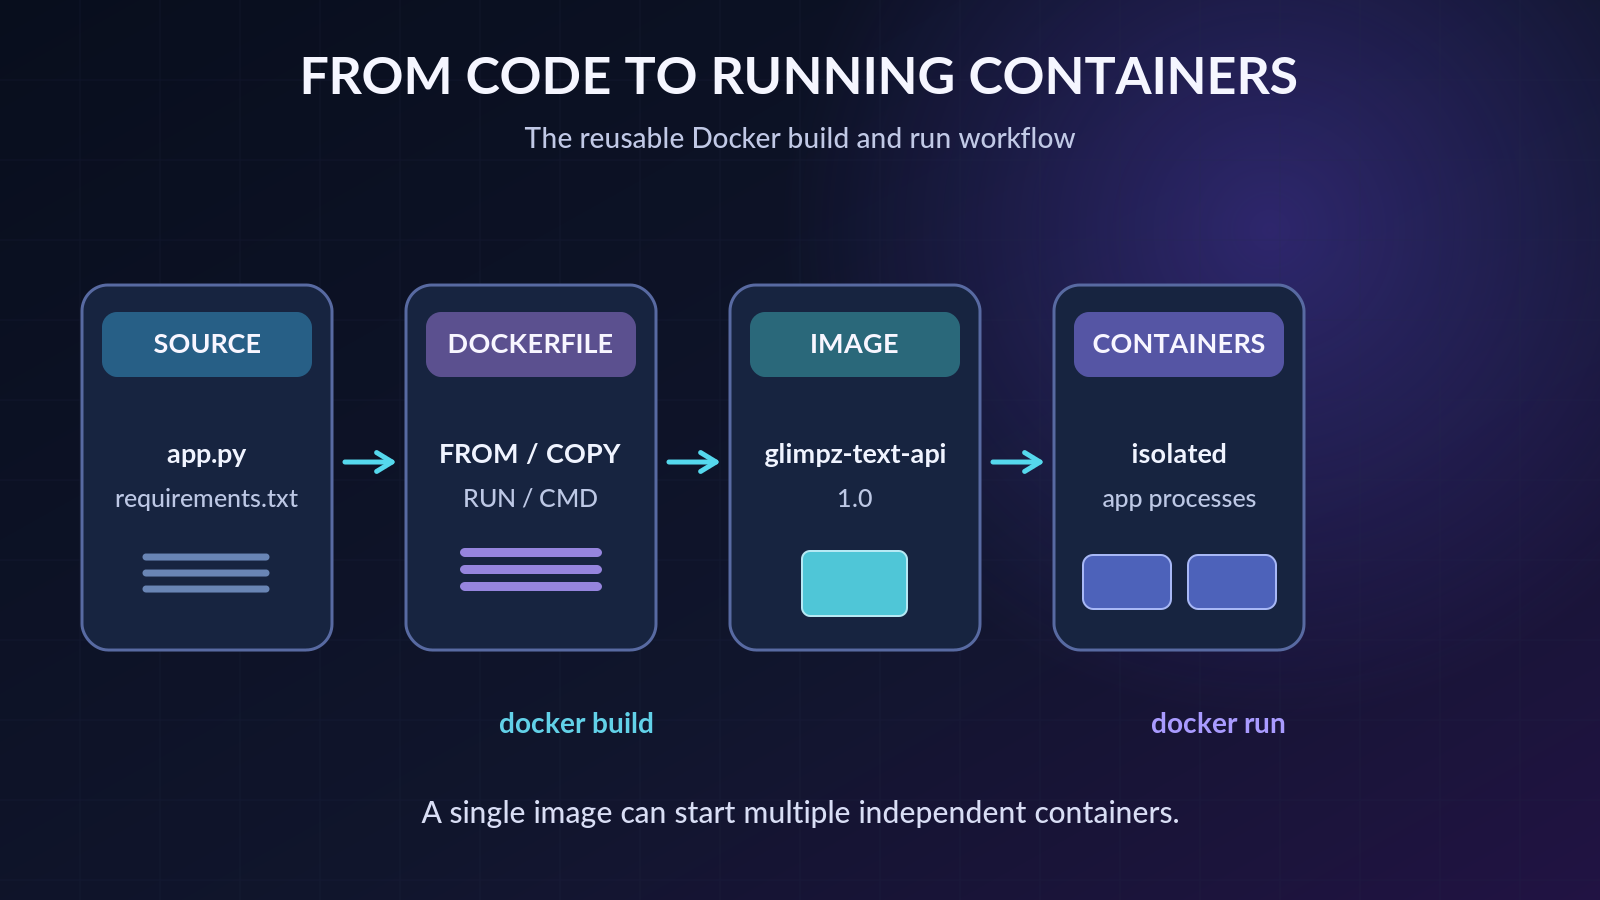
docker build -t glimpz-text-api:1.0 .The -t option supplies a readable image name and tag. The final . means Docker should use the current directory as the build context. The first build may need to download the Python base image and install Python packages.
Check the image list:
docker imagesStart a container from your image:
docker run --name glimpz-api -d -p 127.0.0.1:8000:8000 glimpz-text-api:1.0Now visit http://localhost:8000 (opens in a new tab). The expected response is:
{"message":"Glimpz Docker Lab is running"}You can test the text endpoint without writing a complicated HTTP command. Open http://localhost:8000/docs (opens in a new tab), find POST /analyze, choose Try it out, and enter:
{"text":"Docker makes development more consistent"}The expected result is:
{"word_count":5,"character_count":40}This is a rule-based text-counting example, not AI inference. FastAPI automatically generates an interactive documentation page for the endpoints you define. See the FastAPI documentation (opens in a new tab) for how that works.
If you visit /visits now, a 503 error is expected. The API has not been connected to Redis yet. We will fix that in the next section.
Before moving on, clean up the single-container version so port 8000 is free:
docker stop glimpz-api
docker rm glimpz-api
Step 6: Use Docker Compose to run the API and Redis together
Real applications usually need more than one process. An API might communicate with a database, cache, or background worker. Docker Compose lets you describe these related services in one compose.yaml file and start them together.
The current command form is docker compose, with a space. Many older tutorials use the legacy standalone docker-compose command.
Create compose.yaml beside your Dockerfile:
services:
  api:
    build: .
    ports:
      - "127.0.0.1:8000:8000"
    environment:
      REDIS_HOST: redis
    depends_on:
      redis:
        condition: service_healthy

  redis:
    image: redis:7-alpine
    command: ["redis-server", "--appendonly", "yes"]
    volumes:
      - redis_data:/data
    healthcheck:
      test: ["CMD", "redis-cli", "ping"]
      interval: 5s
      timeout: 3s
      retries: 10

volumes:
  redis_data:
A few details deserve attention:
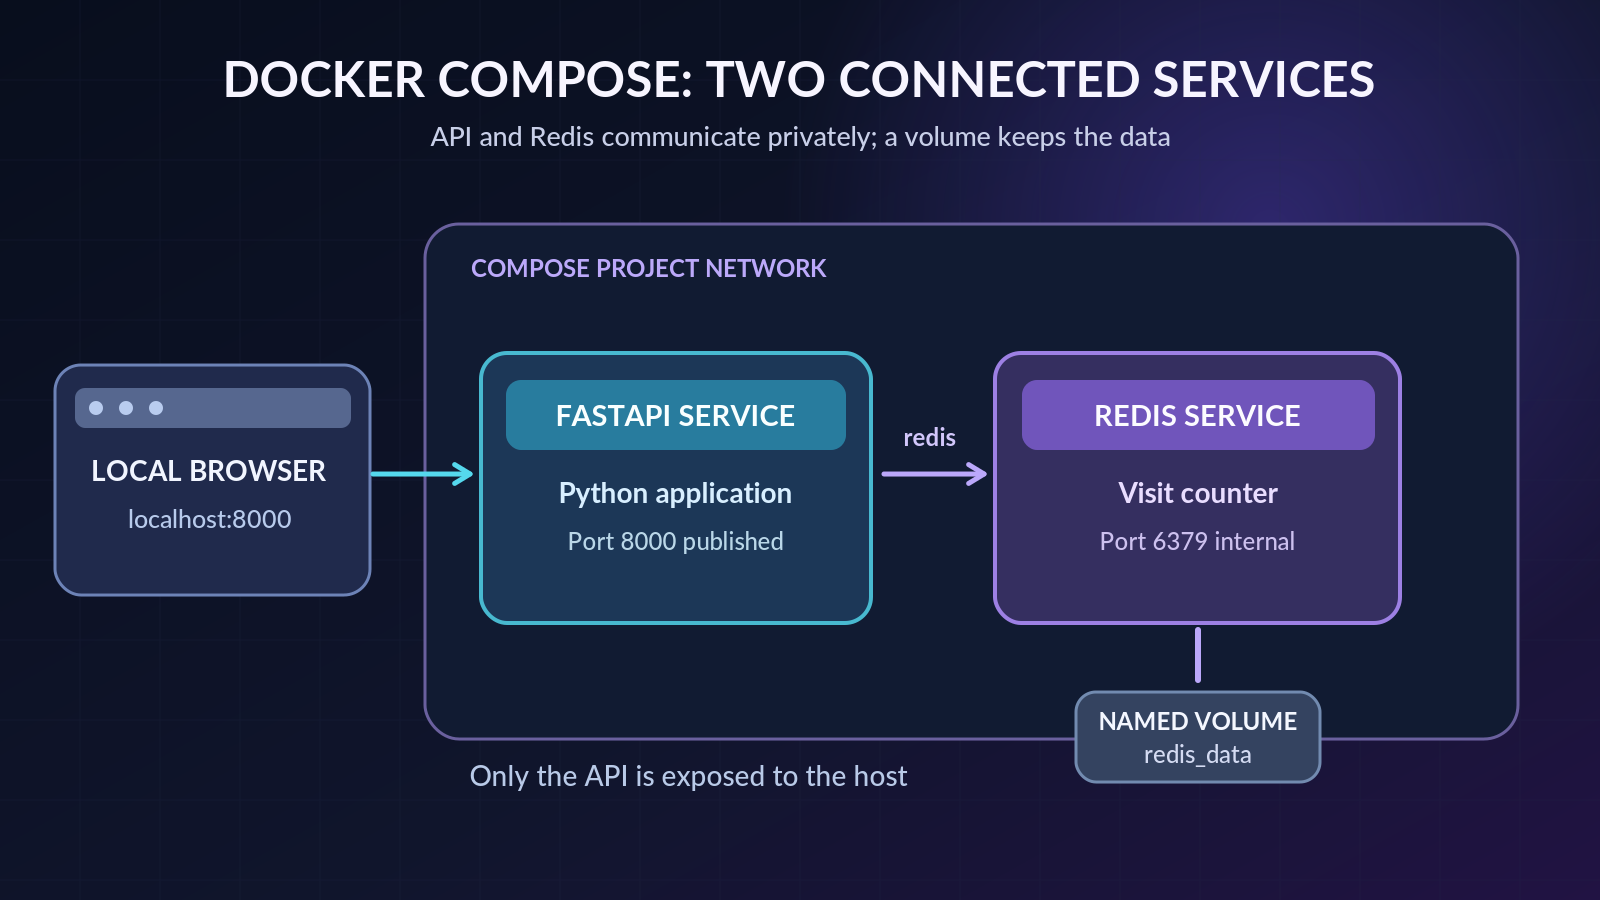
The api service builds an image from your local Dockerfile and publishes only the API port to your computer. The redis service runs a Redis image and does not publish its database port externally.
REDIS_HOST: redis works because Compose creates a network where the service name redis resolves to the Redis container. Inside the API container, localhost would refer to the API container itself, not the Redis container.
The health check is intentional. Plain depends_on establishes startup order, but an application may still start before its dependency is ready. The service_healthy condition instructs Compose to wait until Redis passes the configured health check. Docker documents this in its Compose startup-order guide (opens in a new tab).
The named volume redis_data stores Redis’s files outside its disposable container layer. The --appendonly yes setting enables Redis append-only-file persistence. For real applications, persistence is not the same thing as a tested backup and recovery strategy.
Start the whole setup:
docker compose up --build -dThen inspect it:
docker compose ps
docker compose logs api
Open http://localhost:8000/visits (opens in a new tab) and refresh it a few times. The counter should increase. You can also try the earlier /analyze example while Redis is running.
To inspect the current Redis value from inside the Redis container, run:
docker compose exec redis redis-cli GET visitsYou now have two services running as one small application, with a private service-to-service connection and persistent storage.
Step 7: Understand Docker volumes and test persistence
A container’s writable filesystem should not be treated as your permanent database. Removing a container also removes its writable layer. Docker-managed volumes exist separately from that lifecycle.
Our Compose file mounts redis_data at /data, where Redis writes its persistence files. To see why that matters, first visit /visits enough times to create a number you can remember. Then run:
docker compose down
docker compose up -d
The first command removes the Compose containers and network but normally retains named volumes. The second creates fresh containers while reusing the volume. When you visit /visits again, the count should continue rather than reset. Redis’s append-only log is what allows the stored data to be recovered after restart.
You can inspect the Docker-managed volumes with:
docker volume lsBe careful with this command:
docker compose down -vThe -v option also removes named volumes declared by the Compose project. In our example, that intentionally erases the saved Redis counter. Do not use it casually against an application with important data. See Docker’s volume documentation (opens in a new tab) and docker compose down reference (opens in a new tab).
Volumes vs. bind mounts
A named volume is managed by Docker. It is convenient for data that should persist independently of containers, such as database files.
A bind mount maps a specific file or directory from your computer into a container. It is useful during development when you want code edits on your laptop to appear inside the container. It also couples the setup more closely to your machine’s paths and permissions.
For this beginner project, a named volume is the safer, simpler choice for Redis data. Use bind mounts deliberately when you need to work with local source files.
Step 8: Share your image on Docker Hub (optional)
Your custom image currently lives in your computer’s local image store. If a teammate or a deployment system needs it, you can upload it to an image registry. Docker Hub (opens in a new tab) is a common starting point, but it is not the only registry.
First, create a Docker account and an appropriately configured repository. Make sure you are comfortable with its visibility settings. Before publishing any image, verify that it does not contain secrets, private source files, or confidential data.
Then sign in and tag the image with your own namespace. Replace your-dockerhub-username with your actual Docker Hub username in these commands:
docker login
docker tag glimpz-text-api:1.0 your-dockerhub-username/glimpz-text-api:1.0
docker push your-dockerhub-username/glimpz-text-api:1.0
On another authorized machine, you can download that published image with:
docker pull your-dockerhub-username/glimpz-text-api:1.0A registry stores and distributes the image; it does not automatically deploy the application or create its Redis dependency. To run the full project elsewhere, the new environment still needs the appropriate Compose setup and storage configuration. Docker’s guide to building, tagging, and publishing images (opens in a new tab) explains the complete registry workflow.
Docker commands cheat sheet: what to remember
You do not need to memorize every Docker command. These are the ones you will use most often.
| Command | What it does |
|---|---|
docker --version | Show the installed Docker CLI version |
docker info | Check details about the Docker daemon |
docker pull nginx:stable-alpine | Download an image |
docker images | List local images |
docker build -t myapp:1.0 . | Build and tag an image |
docker tag IMAGE NEW_NAME:TAG | Give an existing image an additional tag |
docker push NAME:TAG | Upload a tagged image to a registry |
docker run --rm hello-world | Run a one-off container |
docker ps | List running containers |
docker ps -a | List running and stopped containers |
docker logs glimpz-api | Read a container’s logs |
docker exec -it glimpz-api sh | Open a shell inside a running container, if available |
docker stop glimpz-api | Stop a container |
docker rm glimpz-api | Remove a stopped container |
docker compose up --build -d | Build and start services in the background |
docker compose ps | Inspect Compose services |
docker compose logs -f api | Follow logs for one Compose service |
docker compose down | Remove Compose containers and networks, keeping named volumes by default |
docker volume ls | List Docker volumes |
For a complete list of flags, use docker --help, docker run --help, or the Docker CLI reference (opens in a new tab).
Common Docker problems and how to fix them
”Cannot connect to the Docker daemon”
The CLI may be installed while the Docker Engine is stopped. Open Docker Desktop and check that it is running. On a Linux Engine installation, check the service status using your distribution’s instructions. Then try docker info again.
”Port is already allocated” or “address already in use”
Another application may already be listening on port 8000 or 8080. Stop the conflicting service or change the host port on the left side of your mapping. For example, use 127.0.0.1:8001:8000 and visit http://localhost:8001.
The page does not open even though the container exists
Run docker ps to confirm it is running, then inspect logs using docker logs CONTAINER_NAME or docker compose logs api. If an API binds only to 127.0.0.1 inside its own container, other containers and the host port mapping may not be able to reach it. Our Uvicorn command deliberately uses --host 0.0.0.0 inside the container, while the published host port is restricted to local access.
The API cannot connect to Redis
Make sure you started the stack with docker compose up, not just the standalone API image. Check docker compose ps and docker compose logs redis. Within Compose, use the service hostname redis, not localhost, to connect from the API container.
Your changes are not appearing
An image is a built artifact, not a live copy of your editor. After changing app.py, rebuild it:
docker compose up --build -dFor a fast-edit development workflow, you can later explore Compose Watch or a carefully configured bind mount. Both have tradeoffs that are worth learning once you understand the basic build cycle.
You cannot delete an image or container
An image may still be referenced by a container, including a stopped one. Inspect docker ps -a before removing anything. Avoid copy-pasting broad cleanup commands from the internet when important project data could be involved.
Docker best practices before you deploy a real application
The tutorial uses some sensible starting choices, but it is not a finished production deployment. Before exposing a service publicly, work through this checklist:
- Lock and maintain dependencies. The tutorial uses broad version ranges for ease of learning. Pin tested versions and update them deliberately in production.
- Choose trusted base images and keep them updated. A compact image can reduce unwanted software, but a small image is not automatically a secure image.
- Use a non-root application user. Our Dockerfile does this, but host configuration and other security controls still matter.
- Keep secrets out of source code and images. Never bake production credentials into a
Dockerfile, image layer, or public repository. Use an appropriate secret-management solution. - Limit network exposure. Only the API is published in our Compose example, and only on the local loopback address. Public production access needs proper TLS, authentication, ingress controls, and logging.
- Design storage and backups deliberately. A volume protects against routine container replacement, not against disk failure or every kind of data corruption.
- Add operational safeguards. Real services need observability, resource limits, update procedures, vulnerability scanning, and an incident recovery plan.
- Test the image on its actual target platform. CPU architecture, host integration, external services, and deployment configuration can still vary.
The Docker image-building best practices (opens in a new tab) are a good next read when you are ready to improve security and reproducibility.
How Docker fits into AI and modern software development
The Python API you built is deliberately basic. But the same workflow is useful when a backend starts serving a real machine learning model: put the model-serving code and its compatible dependencies in an image, build that image in CI, and run the resulting container in an appropriate environment.
Docker can also package background workers, API gateways, developer tools, and local database dependencies. For a larger application, Compose makes local multi-service development convenient. Production orchestration might later use a container platform such as Kubernetes, a managed container service, or a simpler hosting solution.
There are additional concerns with machine learning workloads, including model-file size, licensing, CPU and GPU compatibility, download behavior, secrets, and scaling. Docker solves the packaging problem. It does not automatically solve those broader system-design decisions.
Frequently asked questions about Docker
Is Docker free to use?
Docker Engine and other open-source components have their own licenses. Docker Desktop has separate subscription terms, including free use for qualifying personal, educational, small-business, and non-commercial open-source scenarios. Review the current Docker licensing page before relying on an assumption about business use.
Do I need to learn Linux before Docker?
No. You can start with Docker Desktop and basic terminal commands on Windows or macOS. Familiarity with Linux files, permissions, networking, and processes becomes increasingly useful as you troubleshoot or deploy more complex services.
Is Docker the same as Kubernetes?
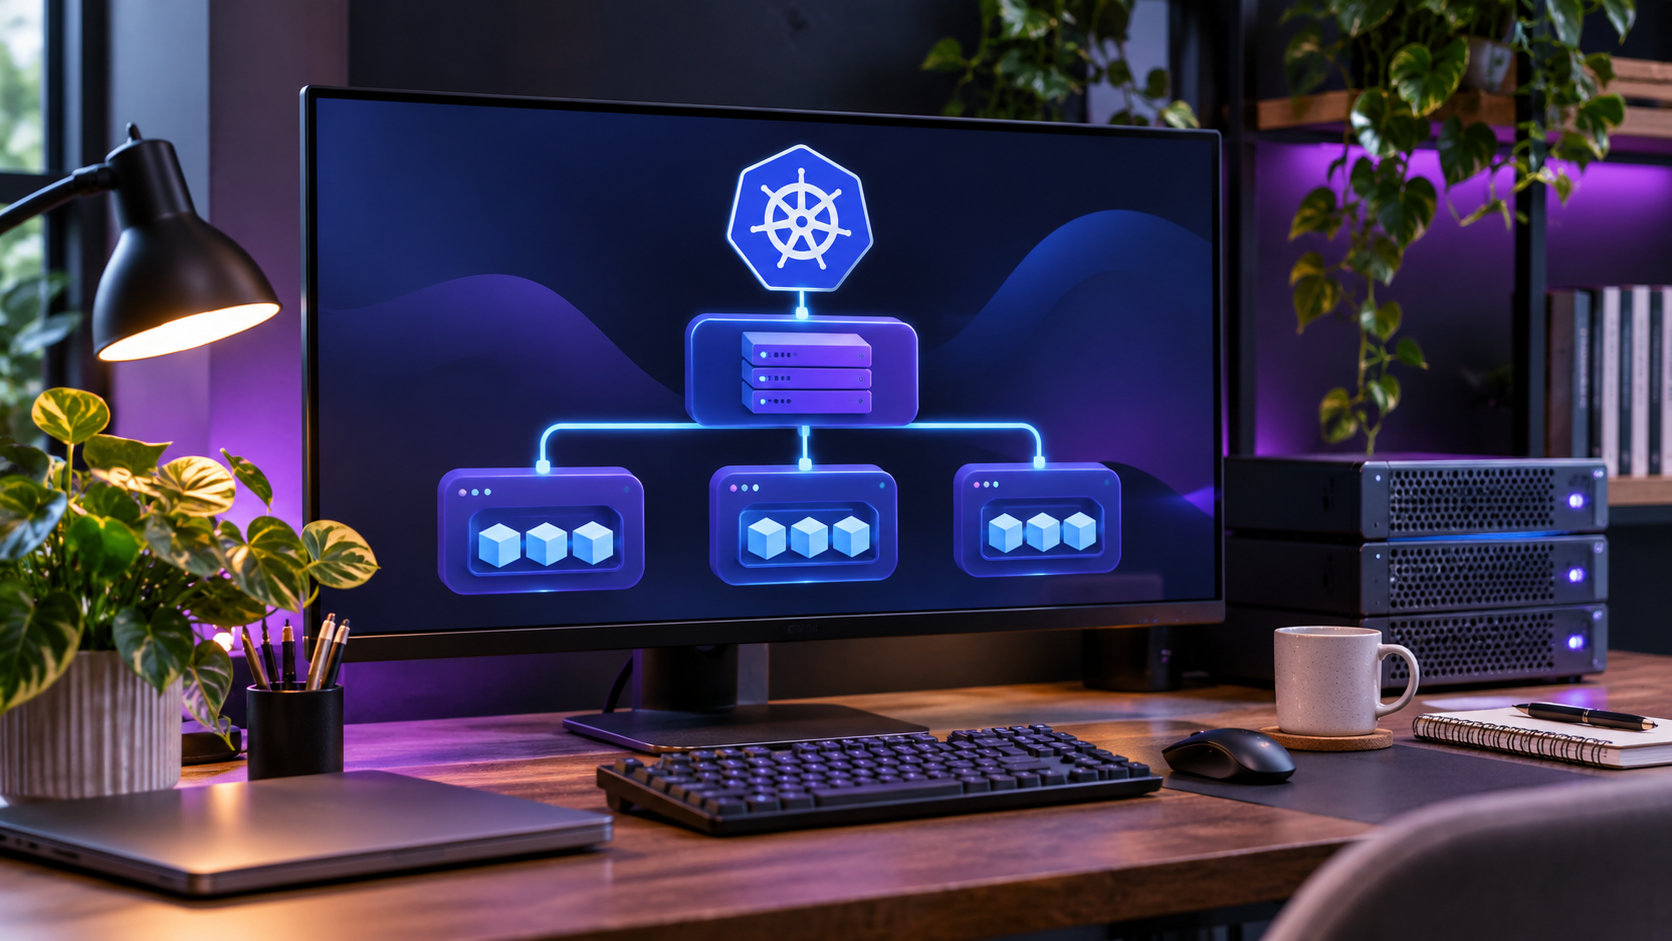
No. Docker helps build and run containerized workloads. Kubernetes is a system for orchestrating containers across machines and managing aspects of their deployment and operation. You can learn Docker fundamentals before deciding whether Kubernetes is necessary for your projects.
Should every application use Docker?
Not necessarily. A small static website, a simple script, or a hosted platform with an excellent native deployment path might not need an additional container layer. Docker is especially valuable when environment consistency, multiple services, controlled dependencies, or portable deployments are important.
If I delete a container, do I lose its data?
Files stored only in that container’s writable layer are lost when the container is removed. Data in a correctly configured named volume remains independently of the container until the volume itself is removed or the storage fails. Application-level persistence configuration still matters, as the Redis example demonstrates.
What is the difference between Dockerfile and Docker Compose?
A Dockerfile explains how to build an image. A Compose file explains which services to start and how they connect, including images, ports, networks, environment variables, dependencies, and volumes. They often work together in one project.
What to try next
If you followed the exercises, you moved from an unfamiliar command to a working two-container application. More importantly, you now know what each piece does: the Dockerfile defines the image, docker run creates a container, Compose coordinates multiple services, and a volume keeps data independent of container replacement.
Try editing the /analyze function to return an additional field, then rebuild the image. Next, try adding a separate background-worker service, or replace the rule-based text counter with a small model you are permitted to distribute. Those are natural ways to turn this beginner exercise into a practical software project.
References and further reading
- Docker: What is a container? (opens in a new tab)
- Docker: Writing a Dockerfile (opens in a new tab)
- Docker: Building, tagging, and publishing an image (opens in a new tab)
- Docker: Python language guide (opens in a new tab)
- Docker: Compose startup order (opens in a new tab)
- Docker: Volumes (opens in a new tab)
- Docker: Image-building best practices (opens in a new tab)
- Redis: Running on Docker (opens in a new tab)
- Redis: Persistence (opens in a new tab)
- FastAPI: First steps and interactive API docs (opens in a new tab)
Keep exploring
Join the conversation
Keep comments respectful and relevant. Please don't share private or sensitive information.
Discussion (0)
Join the conversation